Making a form in React and maintaining it can be painful.
Especially if the form is complicated, with lots of sections and subsections.
Each time a new change needs to be made,
one needs to copy-paste some input tags,
setup default values and configure the state of the form.
If this sounds like an easy thing to do,
wait till your client tells you to put
field A from sub-subsection X of subsection Y of section Z
inside subsection P of section B!
Also, this copypasta
pattern goes against the DRY (Don't Repeat Yourself) principle.
To get a feel for it, assume you have 100 copy-pasted components,
and you need to change the input type of each one of them.
Nightmare isn't it?
Understanding the structure
Your whole HTML Webpage, is rendered in the form of a DOM Tree in the browser.
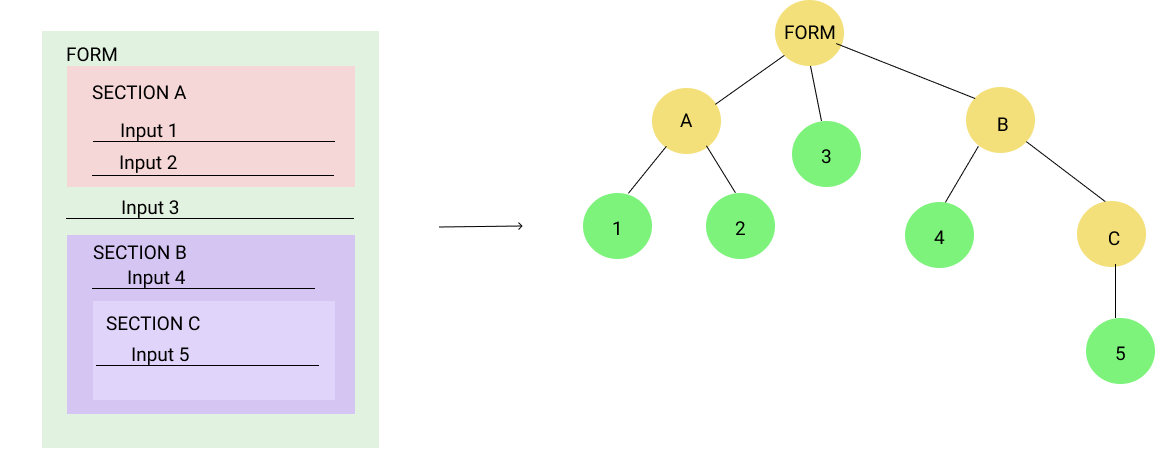
The form is a part of it. The good thing about a Tree Data Structure is that, each of the child nodes that arise from a root node, is a tree in its own right. Hence a form can be modeled as a tree and so can be its subsections.

Now, if you compress the value of each input into a simple JS object (which you can use as the state of the form) you get another tree structure, the object-tree.
For the image above, the tree would look like:
{
    a: {
        input1: "value1",
        input2: "value2"
    },
    input3: "value3",
    b: {
        input4: "value4",
        c: {
            input5: "value5"
        }
    }
}
Notice that if you have a consistent component creation scheme, (i.e., you create and style all your input fields in a similar way), this JSON above is all the information you need to create the form.
Enter Recursive React Components
Till now, we haven't seen any React magic happening. Let's look into it now. Algorithmically speaking (checkmate Competitive Programmers!), if we do a Depth First Traversal of the JSON object, generate an appropriate input field for the leaf nodes and generate section headers for the non-leaf nodes, we are done.
Abstract pseudo-code for the above strategy is:
function generate_form(jsonData){
    for (key in jsonData){
        if (jsonData[key] is Object){
            generate_heading(key);
            generate_form(jsonData[key]);
            end_heading(key);
        }else{
            generate_input(name=key, defaultValue=jsonData[key]);
        }
    }
}
React Components are just JS functions. This means that the above pseudo-code function can be directly translated to a functional component.
Wait! But how do I update states?
Well, there can be many approaches to this. But please do not directly modify the state object using references to its child nodes.

One method that you can follow is this:
- Create a deep copy of your state.
- Pass this deepcopy to the Recursive Form Component as a scapegoat.
- Create a function which when called, simply sets the state to a deep copy of the above mentioned deepcopy (yes, you need to do a copy of copy).
- On change of any field in the form, directly assign the new value to the concerned field in the deepcopy of step 2 and fire the function mentioned in step 3.
The component rendering cycle is as follows:
The reason why we are copying for the 2nd time is that React does a shallow checking of the states to decide whether to re-render a component. Doing a deep copy, will definitely change the reference of the variable passed. This will force React to rerender.
Talk is cheap ...
So, we are done with our Requirement Analysis and Design, let's dive into the code.
The code I'm going to share here is from a live project, albeit a little modified.
It uses Accordion, Form and Card Components of the Material UI library. I am not exhaustively including the imports to keep the code brief and to the point. Instead of using states, here I have used a Redux store for state management.
First, let me show you the recursive component.
| import React from 'react'; | |
| function keyToFieldName(key) { | |
| return key | |
| .replace(/([A-Z])/g, ' $1') | |
| .replace(/^./, function (str) { return str.toUpperCase(); }); | |
| } | |
| function GenericForm({ schema, data, setData, name, display, format = keyToFieldName }){ | |
| // Schema and data have same structure. | |
| // But schema must be immutable. | |
| // data is the mutable prop (connected to state) | |
| let keys = Object.keys(schema); | |
| let classes = useStyles(); | |
| return ( | |
| <div className={classes.accordionRoot}> | |
| <Accordion> | |
| <AccordionSummary | |
| expandIcon={<ExpandMoreIcon />} | |
| aria-controls={name + "-content"} | |
| id={name + "-header"} | |
| > | |
| <Typography className={classes.accordionHeading}> | |
| {format(name)} | |
| </Typography> | |
| </AccordionSummary> | |
| <AccordionDetails> | |
| <div style={{flexDirection: "column"}}> | |
| {keys.map((k) => { | |
| if (display(k)){ | |
| if (typeof(schema[k]) === "object"){ | |
| return (<GenericForm schema={schema[k]} data={data[k]} format={format} name={k} display={display} setData={setData} />); | |
| }else if (typeof(schema[k]) === "number"){ | |
| return ( | |
| <TextField | |
| label={format(k)} | |
| defaultValue={data[k]} | |
| type="number" | |
| InputLabelProps={{ | |
| shrink: true, | |
| }} | |
| onChange={(e) => { | |
| data[k] = Number(e.target.value); | |
| setData(); | |
| }} | |
| /> | |
| ) | |
| }else if (typeof(schema[k]) === "string"){ | |
| return ( | |
| <TextField | |
| label={format(k)} | |
| defaultValue={data[k]} | |
| type="text" | |
| InputLabelProps={{ | |
| shrink: true, | |
| }} | |
| onChange={(e) => { | |
| data[k] = String(e.target.value); | |
| console.log(data); | |
| setData(); | |
| }} | |
| /> | |
| ) | |
| }else if (typeof(schema[k]) === "boolean"){ | |
| return ( | |
| <FormControlLabel | |
| control={ | |
| <Checkbox | |
| checked={data[k]} | |
| name={name + "-" + k + "-checkbox"} | |
| color="primary" | |
| /> | |
| } | |
| label={format(k)} | |
| onChange={() => { | |
| data[k] = !data[k]; | |
| setData(); | |
| }} | |
| /> | |
| ) | |
| }else{ | |
| return (<div style={{display: "none"}}></div>); | |
| } | |
| }else{ | |
| return (<div style={{display: "none"}}></div>); | |
| } | |
| }) | |
| } | |
| </div> | |
| </AccordionDetails> | |
| </Accordion> | |
| </div> | |
| ); | |
| } | |
| export default GenericForm; |
The schema is used as the single source of truth for the rendering.
This becomes particularly useful when dealing with arrays (I omitted that part here.)
Here setData is the function described in step 3 above.
The functions display and format come in handy to decide whether to show and how to show an element respectively.
The function keyToFieldName converts camel case like thisIsAField to a space delimited phrase like This Is A Field.
Notice how for the leaf nodes, the value in schema defines the type of the Input field to be used and also its default value.
Here is how you use the component:
| import React from "react"; | |
| import { cloneDeep } from 'lodash'; | |
| import { connect } from 'react-redux'; | |
| import { defaultCity } from '../reducers/cityReducer'; | |
| import { saveCity } from '../actions/cityActions'; | |
| import GenericForm from './GenericForm'; | |
| function CustomForm({ city, dispatch}){ | |
| const classes = useStyles(); | |
| let data = cloneDeep(city); | |
| const setData = () => { | |
| dispatch(saveCity(cloneDeep(data))); | |
| } | |
| return ( | |
| <div> | |
| <GenericForm schema={defaultCity} data={data} name="City Parameters" display={k => true} setData={setData} /> | |
| <div className={classes.btnRoot}> | |
| <Button variant="contained" color="primary" onClick={() => {setData()}}>Save and Continue</Button> | |
| </div> | |
| </div> | |
| ) | |
| } | |
| const mapStateToProps = (state, props) => { | |
| return { | |
| ...props, | |
| city: state.city | |
| } | |
| }; | |
| export default connect(mapStateToProps)(CustomForm); |
Notice how we are using the cloneDeep function from lodash library to perform the deep copy.
dispatch and mapStateToProps are usual Redux jargon.
city is the actual data field on which the form is built.
saveCity is a function that wraps the data to be used
to set the city object inside a Redux action.
defaultCity is the default schema (obvious!).
Result

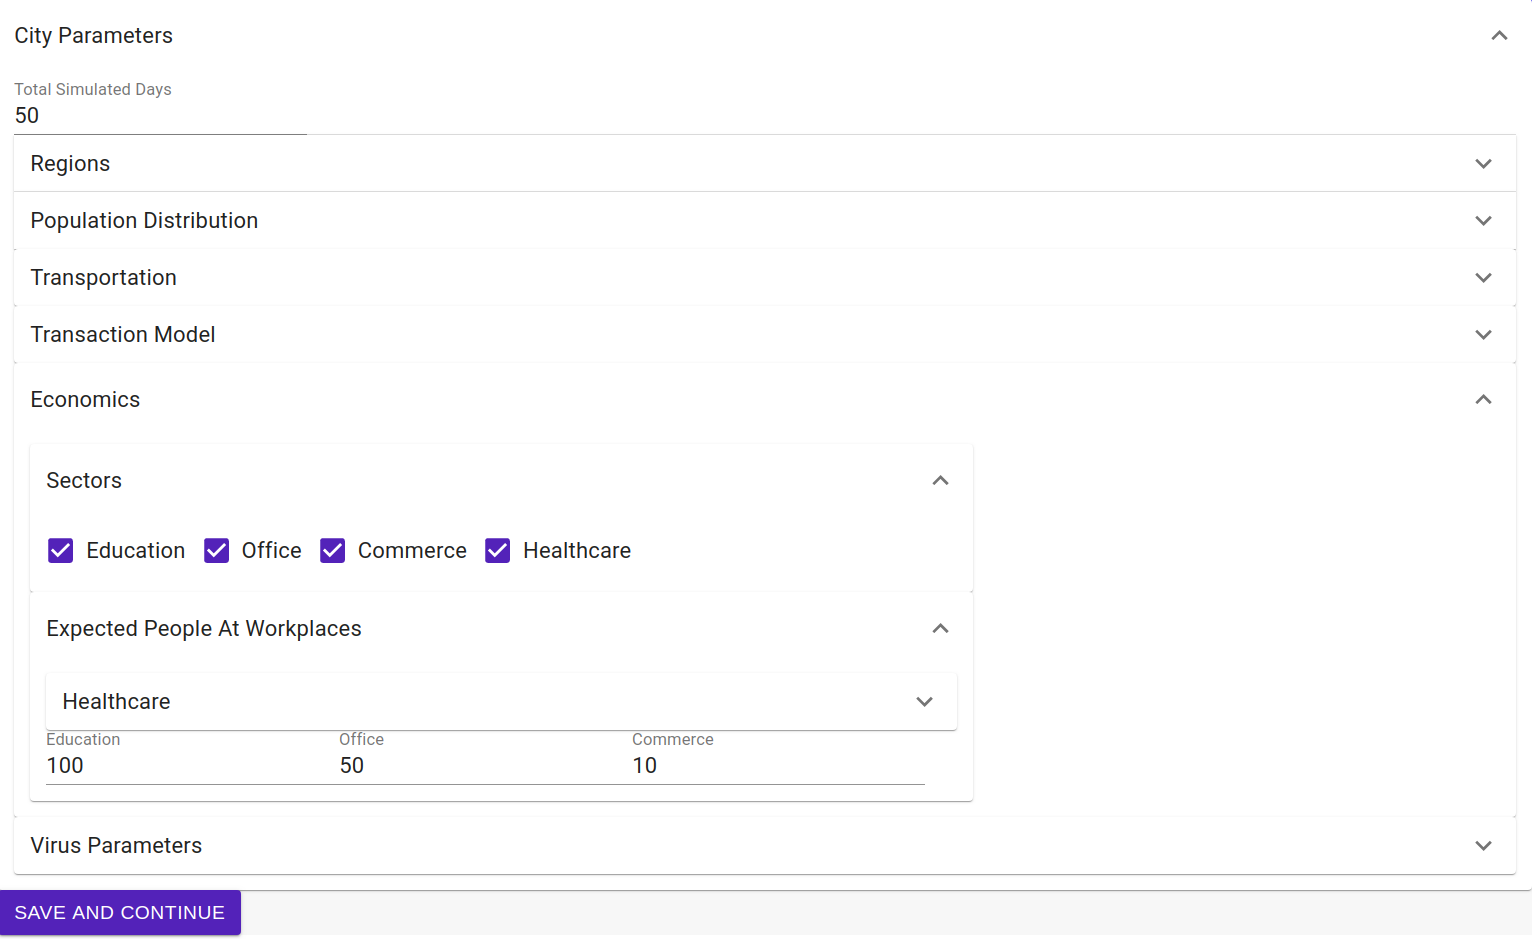
This is what it kinda looks like.
I think you can guess how city data structure looked like.
I am new to Redux. Let me know in the comments if you found anything wrong here.
